Saturday, November 19, 2016

Analog TO THE MAX! Freq Readout for the BITX40

Perhaps this was a reaction to a frustrating morning spent trying to get a 20x4 digital display to work with an Si5351 and an Arduino Uno via an I2C bus (I feel my blood pressure rising just due to the typing of those words).   After much digital fiddling, I called declared a "BASTA!"  and looked around the shack for an antidote for the digital frustration.  There on the bench was my fully analog BITX40Module rig, with its homebrew L-C analog VFO.   It needed a better frequency readout. And this morning, it got one. 
The pointer is Sharpie ink on a bit of PC board.  It is held in place by superglue, suspended about 1/4 inch off the chassis (to reduce dial parallax).  The numerals are in Dymo tape -- there was not enough room for the "7" but I think I will be able to remember this.

73 Bill N2CQR  

Sunday, November 13, 2016

AGC for the BITX

Many BITXers have longed for a simple AGC circuit. So here it is, it just fits all around the volume control. Here is the circuit :

The Audio-In from the original volume control comes into the circuit on the left and the Audio Out is sent to the volume control's hot end. The 2N7000 and the drain resistor together form a volume control. The tapped down audio is amplified by the transistor (use any NPN transistor) and rectified into a DC voltage by the diode. As the incoming audio level increases, the bias on the 2N7000 goes up and the drain-source resistance drops, bringing the volume down. Below is my ugly version of this AGC. I built it in a few minutes. For the last few hours, it has been fun using it.

Saturday, November 12, 2016

Putting a Larger Heatsink on the BITX40 Module


The fan that I installed yesterday was driving me nuts.  It was noisy, both acoustically and electrically.  And I would occasionally get my fingers in the blades.  Not good.  While it did seem to keep the IRF510 from getting too hot, I knew that a real heatsink would do better thermally.

But how was I going to attach the sink to the transistor?  That tab on the IRF510 goes to the collector, so if it touches a grounded heat sink, you get a short.   A nylon screw and some mylar between the transistor tab and the heat sink is one option.  But I didn't have a nylon screw.  So I decided to just keep the heat sink electrically insulated from the chassis.

This project required me to refresh my memory on how to tap a 4-40 hole.  I went back and watched the short video I made on the tribal knowledge that Pete had shared with me.  Out came the Tap and Die gear and the machine oil.  The process went very smoothly.

Here is what I did to get the heatsink in place:

1) After removing the original heatsink, I gently bent the leads on the IRF510 so that the transistors outer edge would be flush with the edge of the PC board.
2) I put a strip of thick tape (Gorilla Tape) along the lower side of the heat sink. This will keep the heat sink from shorting to the chassis.
3) I placed the heatsink where I wanted it, and carefully marked where the mounting screw (through the transistor's tab) should go.
4) Drill!  Tap!  (see video)  https://www.youtube.com/watch?v=LuqliWT1k5A
5) I applied some heat sink compound (or Desitin!) and then attached the transistor to the heatsink.
6) I put a few drops of glue between the heatsink and the board and the chassis, just to mechanically stabilize it a bit.
7) Bob's your uncle.

It seems to work great.  The MOSFET stays cool. even after long "old buzzard" transmissions.  And I notice no stability problems.  It was fun  to put to use some tribal knowledge and refresh a mechanical skill.  

73 Bill N2CQR
 

Friday, November 11, 2016

Improving the audio

The BITX transceivers have more receiver gain than needed. Backing it off a little makes the audio sweeter. Here is the mod:

Just remove the 1uf capacitor between pins 1 and 8 of the LM386. It is C113 in the BITX40 SMD boards. 

An Extroverted BITX40

I was going to put the BITX40 Module in a box today, but I just couldn't bring myself to do it. That board looks too good to be hidden inside a box.  So I put it topside. That's the analog VFO to the right. You can see a fan off to the left -- that is perhaps temporarily in lieu of a large heat sink for the final. You can see the two Gel cells in the background.  I am indeed running 24 volts to the final, and am putting out about 20 watts.  I had three nice contacts today on 40:  WB2RON up on Long Island said I was "20 over".  Later I worked W1SJ in N. Vermont -- I was 5-9.  Then -- icing on the cake -- DK1NO in Stuttgart.  I was 5-8. I kind of like this arrangement -- it has the "three dimensional" feel of an old tube rig.  This obviously wouldn't be good for portable operations, but I am not planning on going portable.   There is a lot of room under the chassis.   I could put a digital VFO in there and put in a switch so that I can easily go from digital to analog.

73  Bill N2CQR


Thursday, November 10, 2016

Two Gel Cells and a Heatsink: BITX40 Power Hack

I blame Pete Juliano N6QW for this.  And Farhan.  Pete has been leading us astray with his talk of high power linear amplifiers ("Two 813s kid, that's all you need!").  And Farhan practically pushed us beyond QRP limits by placing a separate DC power connector for the IRF510 final amplifier on his new BITX 40 Module board.  Farhan writes: 

There are jump-points from where you can add more modules like the DDS, more bands, better audio amplifier, etc. Imagination is your limit. You can separately increase the power amplifier's supply voltage to 25 volts to be more than 20 watts of power : You will have to add a better heat sink. The mods are on the way! (from hfsigs.com)

A while back Chris KD4PBJ sent me some very nice heat sinks -- one of those would fit quite nicely on the PA side of the BITX40 board.  And I just happen to have two 12V Gel cell batteries. One will power the board and the two together will power the IRF510.  With 20 watts out to my dipole I feel confident that I will WIN the upcoming ARRL Phone Sweepstakes (in my category: Homebrew VFO, Northern Virginia).

73 from Northern Virginia  Bill N2CQR

Thursday, November 3, 2016

Reverse Polarity Protection


When I opened the package from India and saw Farhan's s beautiful board with all those little SMD parts, I immediately worried about frying those parts by accidentally reversing the polarity of the 12 volt DC input.   Believe me, this can happen.  It is especially likely during the early, enthusiastic testing and experimenting that takes place in the days after the arrival of a new rig. 

So, my friends:  Save yourselves the agony of fried components!  Don't let your BITX 40 Module go up in smoke!  Install a simple reverse polarity protection circuit BEFORE you start working with your new board. 

Here is what I did:   I just took a diode (a fairly hefty diode) and I soldered it in between the pins of that neat little circular power jack that Farhan sent with the module.  Be sure to solder it in so that it does NOT conduct if you have connected the power correctly.  The arrow should be pointing to positive terminal.  Then put a fuse (3 amp or even a 2 amp) in the line from the connector to the power supply or battery.  If you don't have a holder you can try just soldering the fuse into the line.

With these two little parts, you can save yourself a lot of grief:  If (WHEN!) you connect red to black and black to red, that diode will conduct like crazy and will blow the fuse.  You'll just have to replace the fuse (and not the module).


Wednesday, November 2, 2016

Smoking The Electret

Bill, N2CQR has hit the airwaves with a mic that he hacked out in a single evening. Here is his post about it on his famous blog at SolderSmoke


Tuesday, November 1, 2016

A Case for the BITX40


Pratap, also known simply as 'Pop' is VU2POP, is a great homebrewer, QRPer and avid satellite dx-er. He has designed a beautiful, low cost box for the BITX40 board. It even has space for an LCD display!

If you want these boxes, look him up on qrz.com.


An VFO for the BITX40

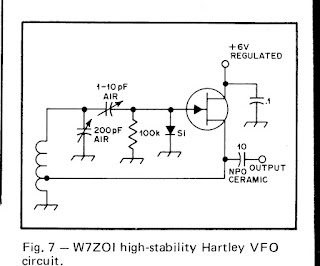
Bill of Soldersmoke has posted a very neat hack for the BITX40. An outboard analog VFO! It is as simple as it is clean and good. If you happen to be lucky enough to own a nice variable capacitor, this probably the one hack you need to make to your BITX!

So, this is, simply the VFO that he built :


It looks like this 

Read more about his hack on soldersmoke blog .


Drift on the BITX40


Many have noticed that the VFO of the BITX40 is a little 'drifty'. This is because the six bidirectional amplifiers (Q1, to Q6) have increased current for better signal handling, with each takes 22 ma and they heat up the board. Thse cause the board to warm up and the VFO to drift. You can see the board getting warm if you hold your finger on these parts. 

First thing you need to check is that the L4 is already glued to the board. This was originally kept unglued to allow you to change the VFO frequency coverage.  We assume that you have already glued the L4 (VFO coil) to the board. If you still feel your BITX40 to be drifty, Here is what you need to do :

What you need to do :
The resistors R12, R22, R32, R45, R55, R65 (six of them, all of them 100 ohms) control the current in the six bidirectional amplifiers. Replace these 100 ohm resistors with 220 ohm resistors.


The 100 ohms to be changed (in the circuit
How to do it :
Resistors as seen on the PCB

  1. Locate these resistors in the amplifiers around Q1,Q2,Q3,Q4,Q5 and Q6. These are marked as 101, black resistors. You need to desolder these. DONT DESOLDER THOSE MARKED AS '100' - THOSE ARE 10 OHM RESISTOR. Sorry, for the shouting, I thought it was important. 
  2. Remove them. My easy way to remove them is to use my regular 25 watt iron and gently press it's flat top over the resistor covering both ends as if it were a shirt that i was pressing with my iron. in a few seconds, the solder on both sides would have melted and you can simply slide the resistor away.
  3.  Replace. The pads on the PCB are large enough for you to solder regular 1/4 watt resistors vertically, Manhattan style. If want, you could solder SMD resistors as well, size 1206. If you don't have them, write to hfsignals@gmail.com and they will send you a pinch of these for free.
Why it works:
The board becomes cooler after this mod. It will still take 10 minutes for the drift to stabilize. But don't expect the board to be stable as soon as you have changed the resistors, the heat from all that soldering work has to dissipate before it can be stable.